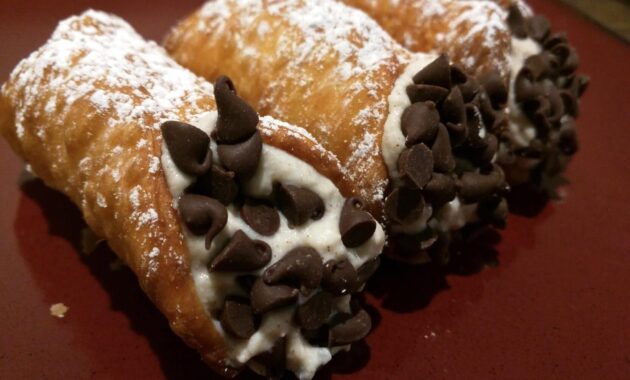
Ah, cannoli! These iconic Sicilian pastries are more than just a treat; they’re a culinary experience. Crispy, golden shells shatter with each bite, giving way to a creamy, sweet ricotta filling that’s simply irresistible. For many, the thought of making cannoli at home seems daunting, reserved for professional pastry chefs and seasoned Italian nonnas. But I’m here to tell you that with a little patience and this detailed, step-by-step recipe, you can easily create these delightful desserts in your own kitchen. Get ready to impress your friends and family with homemade sweet cannoli that rivals anything you’d find in a bakery. Let’s embark on this delicious journey and unlock the secrets to perfect sweet cannoli!
![Easy Cannoli Cheesecake Recipe [Italian Cheesecake]](https://recipewiki.eu.org/wp-content/uploads/2025/11/Cannoli-e1575476905195-630x380.jpg)


Before we dive into the specifics, let’s take a quick look at what makes cannoli so special. The contrasting textures – the crunchy shell and the smooth filling – are a key element. The flavor profile is equally important, with the subtle sweetness of the ricotta perfectly balanced by the crisp shell. And, of course, the presentation is everything. A well-made sweet cannoli is a feast for the eyes as well as the taste buds.

| Category | Value |
|---|---|
| Preparation Time | 45 minutes (plus 2 hours chilling time) |
| Cooking Time | 20-25 minutes |
| Servings | Approximately 12 cannoli |
| Difficulty | Intermediate |
Nutrition per Serving (estimated)
Please note that these values are estimates and can vary based on specific ingredients and portion sizes.

| Nutrient | Amount per Serving |
|---|---|
| Calories | Approximately 350-400 kcal |
| Fat | 20-25g |
| Saturated Fat | 12-15g |
| Cholesterol | 80-100mg |
| Sodium | 100-150mg |
| Carbohydrates | 30-35g |
| Sugar | 20-25g |
| Protein | 10-12g |
Ingredients
For the Cannoli Shells:
| Ingredient | Quantity |
|---|---|
| All-purpose flour | 2 cups (250g) |
| Granulated sugar | 2 tablespoons |
| Salt | 1/4 teaspoon |
| Unsweetened cocoa powder | 1 tablespoon |
| Ground cinnamon | 1/4 teaspoon |
| Cold unsalted butter, cut into cubes | 2 tablespoons |
| Dry red or white wine | 1/2 cup (approximately, may need slightly more) |
| White vinegar | 1 teaspoon |
| Egg white, lightly beaten | 1 (for sealing the shells) |
| Vegetable oil, for frying | Approximately 4-6 cups |
For the Sweet Ricotta Filling:
| Ingredient | Quantity |
|---|---|
| Whole milk ricotta cheese | 3 cups (about 24 oz), drained very well |
| Powdered sugar | 3/4 cup (or more, to taste) |
| Vanilla extract | 1 teaspoon |
| Mini chocolate chips | 1/2 cup |
| Candied orange peel, finely chopped (optional) | 1/4 cup |
For Garnish (optional):
| Ingredient | Quantity |
|---|---|
| Powdered sugar | For dusting |
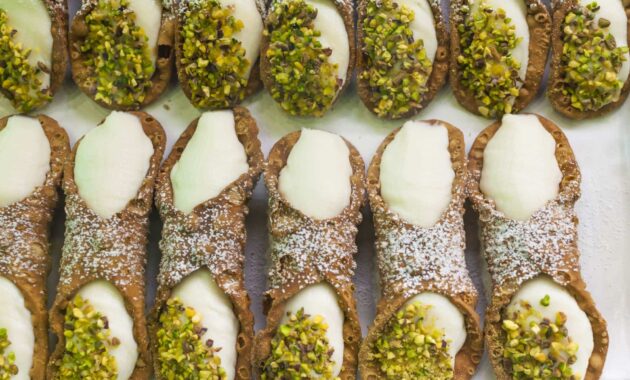
| Chopped pistachios | For dipping ends |
| Mini chocolate chips | For dipping ends |
| Candied cherries | For garnish |
Cooking Instructions
- Prepare the Cannoli Dough: In a large bowl, whisk together the flour, sugar, salt, cocoa powder, and cinnamon. Add the cold, cubed butter and cut it into the flour mixture using a pastry blender or your fingertips until the mixture resembles coarse crumbs.
- Add Wet Ingredients: In a small bowl, combine the red wine and white vinegar. Gradually add the wet ingredients to the dry ingredients, mixing until a dough forms. You may need to add a little more wine if the dough is too dry. The dough should be firm but not sticky.
- Knead the Dough: Turn the dough out onto a lightly floured surface and knead for 5-7 minutes, until smooth and elastic. This step is crucial for developing the gluten, which will give the shells their characteristic crispness.
- Chill the Dough: Wrap the dough tightly in plastic wrap and refrigerate for at least 2 hours, or preferably overnight. This allows the gluten to relax and makes the dough easier to roll out.
- Roll Out the Dough: On a lightly floured surface, roll out the dough to about 1/8 inch thickness. Use a 4-5 inch round cookie cutter or a knife to cut out circles.
- Shape the Cannoli Shells: Wrap each circle of dough around a cannoli form (metal or wooden tubes). Brush one edge of the dough with the lightly beaten egg white and overlap the other edge to seal. Press firmly to ensure a good seal.
- Fry the Cannoli Shells: Heat vegetable oil in a deep pot or deep fryer to 350°F (175°C). Carefully drop a few cannoli shells at a time into the hot oil, making sure not to overcrowd the pot. Fry for 2-3 minutes per side, until golden brown and crispy.
- Drain and Cool: Remove the fried shells from the oil using a slotted spoon and place them on a wire rack to drain and cool completely. Once cooled slightly, carefully slide the cannoli forms out of the shells. Be gentle to avoid breaking the delicate shells.
- Prepare the Ricotta Filling: While the shells are cooling, prepare the filling. In a large bowl, combine the drained ricotta cheese, powdered sugar, and vanilla extract. Beat with an electric mixer until smooth and creamy. Taste and adjust the sweetness if needed.
- Fold in the Mix-ins: Gently fold in the mini chocolate chips and candied orange peel (if using).
- Fill the Cannoli: Transfer the ricotta filling to a piping bag fitted with a large round tip. Pipe the filling into both ends of each cooled cannoli shell. Be careful not to overfill them, as the filling can cause the shells to soften.
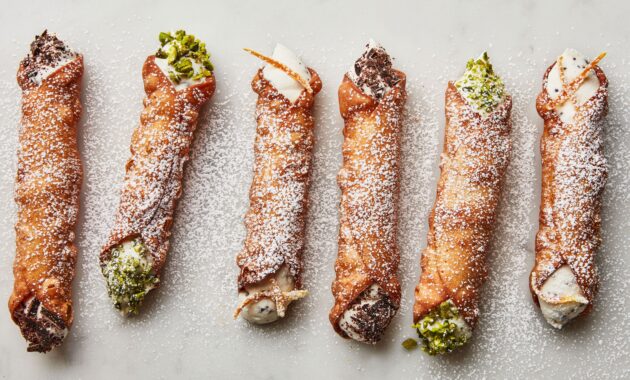
- Garnish and Serve: Dust the filled cannoli with powdered sugar and dip the ends in chopped pistachios or mini chocolate chips. You can also garnish them with candied cherries. Serve immediately for the best texture and flavor. The sweet cannoli are best enjoyed fresh!
Serving Suggestions
Sweet cannoli are perfect as a dessert after an Italian meal, or as a special treat for any occasion. Here are a few serving suggestions:

- Serve with a strong cup of espresso or cappuccino.
- Arrange them on a platter for an elegant presentation.
- Offer a variety of garnishes for your guests to choose from.
- Pair with other Italian desserts like biscotti or tiramisu.
- Enjoy them fresh for the ultimate crispy-creamy experience.
Tips and Notes for Perfect Sweet Cannoli
Making sweet cannoli can be a rewarding experience, but it also requires attention to detail. Here are some tips and notes to help you achieve cannoli perfection:
- Draining the Ricotta: This is the most crucial step. Excess moisture will result in a soggy filling. Drain the ricotta for at least 24 hours in the refrigerator using a cheesecloth-lined sieve.
- Temperature Control: Maintaining the correct oil temperature is essential for crispy shells. Use a thermometer to monitor the temperature and adjust as needed. If the oil is too hot, the shells will burn quickly. If it’s too cool, they’ll absorb too much oil.
- Shell Sealing: Make sure to seal the shells tightly to prevent them from opening during frying. The egg white acts as a glue, so use it generously.
- Filling Timing: It’s best to fill the cannoli just before serving to prevent the shells from becoming soggy. The moisture in the filling will eventually soften the shells, so don’t fill them too far in advance.
- Storage: If you have leftover shells or filling, store them separately in airtight containers. The shells will stay crispy for a few days, and the filling can be stored in the refrigerator for up to 3 days.
- Variations: Feel free to experiment with different flavor combinations. You can add different extracts to the filling, such as almond or lemon. You can also use different types of chocolate chips or nuts.
- Cannoli Forms: Invest in good quality cannoli forms. Metal forms are more durable and easier to clean than wooden forms.
With these tips and this comprehensive recipe, you’re well on your way to creating delicious, authentic sweet cannoli at home. Don’t be intimidated by the process; it’s easier than you think. So, gather your ingredients, put on your apron, and get ready to impress your friends and family with your newfound pastry skills. These sweet cannoli are guaranteed to be a hit! Enjoy the process and the delicious results!
Mastering the art of sweet cannoli making is a journey worth taking. Each step, from preparing the dough to piping the creamy filling, is an opportunity to learn and perfect your skills. And the reward – a perfectly crisp and creamy cannoli – is well worth the effort. Remember to be patient, follow the instructions carefully, and don’t be afraid to experiment with different flavors and garnishes. Soon, you’ll be creating sweet cannoli that are the envy of everyone you know. So, go ahead, embrace the challenge, and indulge in the sweet satisfaction of homemade cannoli. Buon appetito!