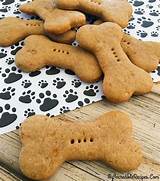
Homemade Dog Biscuit Recipe: A Guide to Spoiling Your Furry Friend
Are you looking for a way to show your furry friend some love? Baking homemade dog biscuits is a fun and rewarding activity that allows you to control the ingredients and ensure your dog is getting healthy and delicious treats. This recipe is simple, customizable, and guaranteed to be a tail-wagging success!
Why Make Homemade Dog Biscuits?
Store-bought dog biscuits often contain artificial colors, flavors, and preservatives that can be detrimental to your dog's health. Making your own biscuits gives you complete control over the ingredients, allowing you to cater to your dog's specific dietary needs and preferences. Plus, it's a great way to bond with your canine companion!
Benefits of Homemade Dog Biscuits:
- Healthy Ingredients: You choose only the best, all-natural ingredients, avoiding artificial additives.
- Customizable: Adjust the recipe to suit your dog's allergies and dietary requirements.
- Cost-Effective: Making your own biscuits can be cheaper than buying them from the store, especially in the long run.
- Fun Activity: Baking with your dog (supervised, of course!) can be a fun and memorable experience.
- Quality Control: You know exactly what's going into your dog's treats.
The Simple & Delicious Dog Biscuit Recipe
This recipe yields approximately 24 biscuits, depending on the size of your cookie cutter.
Ingredients:
- 2 cups whole wheat flour (or oat flour for gluten-free option)
- 1/2 cup rolled oats
- 1/4 cup peanut butter (xylitol-free!)
- 1 egg
- 1/2 cup water (or beef broth for added flavor)
Instructions:
- Preheat & Prepare: Preheat your oven to 350°F (175°C). Line a baking sheet with parchment paper.
- Combine Dry Ingredients: In a large bowl, combine the whole wheat flour and rolled oats.
- Add Wet Ingredients: Add the peanut butter, egg, and water (or broth) to the dry ingredients. Mix thoroughly until a dough forms. If the dough is too dry, add a tablespoon of water at a time until it's pliable.
- Roll & Cut: On a lightly floured surface, roll out the dough to about 1/4 inch thickness. Use cookie cutters to cut out your biscuits. You can use bone shapes, circles, or any shape you like!
- Bake: Place the biscuits on the prepared baking sheet and bake for 20-25 minutes, or until golden brown.
- Cool & Enjoy: Let the biscuits cool completely before giving them to your dog. Store in an airtight container at room temperature for up to a week.
Tips for Perfect Dog Biscuits:
- Xylitol-Free Peanut Butter: Always use xylitol-free peanut butter, as xylitol is extremely toxic to dogs.
- Ingredient Variations: Feel free to experiment with different ingredients! You can add things like shredded carrots, sweet potato, or even a little bit of cheese (in moderation).
- Storage: Store your biscuits in an airtight container in a cool, dry place to maintain freshness.
- Moderation: Remember, these are treats, not a meal replacement. Feed your dog biscuits in moderation as part of a balanced diet.
Boost Your Biscuit Game: Adding Nutritional Benefits
Consider incorporating these healthy additions for extra nutritional value:
- Sweet Potato: Adds vitamins and fiber.
- Carrots: Rich in beta-carotene and fiber.
- Parsley: Provides antioxidants and helps with breath freshening. (Use sparingly.)
- Oatmeal: Good source of fiber.
Making homemade dog biscuits is a fantastic way to show your canine companion how much you care. With this easy recipe and a few simple tips, you'll be baking delicious and healthy treats in no time! Remember to always supervise your dog when they are enjoying their treats. Happy baking!
