The Ultimate Fudgy Brownies: Your New Go-To Dessert
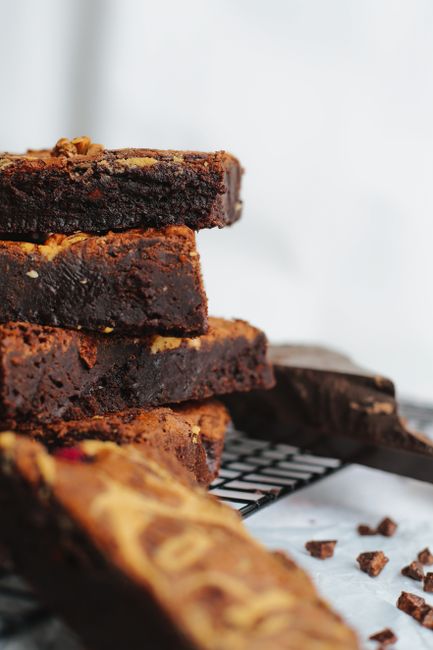
Close your eyes for a second. Imagine biting into a brownie so fudgy it almost melts on your tongue, with a crackly, paper-thin crust giving way to an intensely chocolatey, slightly gooey center. That’s what we’re making today. These aren’t just any brownies—they’re the kind that make people stop talking mid-sentence. The secret lies in the perfect balance of melted chocolate, a double dose of sugar for that signature crinkle, and a method that’s forgiving enough for first-time bakers. Whether you’re cheering up a Tuesday or celebrating a special occasion, this recipe delivers pure, unadulterated chocolate joy.





🍫 Recipe Overview
Nutrition Facts (per brownie)
- Calories: 280 kcal
- Protein: 3g
- Fat: 16g
- Carbohydrates: 35g
- Fiber: 2g
- Sugar: 25g
Ingredients
Using quality ingredients makes a noticeable difference here, especially with the chocolate.
Chocolate Base
- 1 cup (226g) unsalted butter – cut into tablespoons for even melting
- 8 oz (227g) semisweet chocolate, chopped – use a bar chocolate (54-60% cacao) for best flavor, not chips
Sweeteners & Eggs
- 1 ½ cups (300g) granulated sugar – for structure and that shiny top
- ¾ cup (150g) packed brown sugar – light or dark, for moisture and caramel notes
- 4 large eggs, room temperature – crucial for proper emulsification
- 2 teaspoons pure vanilla extract
Dry Ingredients
- 1 cup (120g) all-purpose flour – spooned and leveled
- ½ cup (50g) unsweetened cocoa powder – natural or Dutch-processed both work
- 1 teaspoon salt – enhances all the chocolate flavors
- 1 cup (175g) chocolate chips or chunks (optional) – for extra pockets of molten chocolate
Instructions
Step 1: Prep and Melt Chocolate
Start by preheating your oven to 350°F (175°C). Line your 9×13 inch pan with parchment paper—this guarantees clean removal and easy slicing. For the chocolate, use a double boiler: place the bowl over a saucepan with an inch of simmering water (make sure the bowl doesn’t touch the water). Melt the butter and chopped chocolate together, stirring occasionally until completely smooth and glossy. Take it off the heat and let it cool for 5 minutes. If you rush this and add hot chocolate to the eggs, you might scramble them.
Step 2: Whisk Sugars and Eggs
In a large bowl, combine both sugars, the eggs, and vanilla. Now, whisk vigorously by hand for a good 1-2 minutes. You’re looking for the mixture to turn pale, thicken slightly, and fall from the whisk in thick ribbons. This step is the magic behind the crinkly, shiny top—it dissolves the sugar and incorporates air. Don’t skip it!
Step 3: Combine Wet Ingredients
With the whisk still in hand, slowly drizzle the warm (not hot) chocolate mixture into the egg-sugar mixture. Keep whisking as you pour to temper the eggs and create a smooth, emulsified batter. Once fully combined, it should be dark, glossy, and homogeneous.
Step 4: Fold in Dry Ingredients
Sift the flour, cocoa powder, and salt directly over the batter. Sifting prevents lumps and ensures even distribution. Switch to a rubber spatula and gently fold the dry ingredients into the wet. Use a figure-eight motion and fold from the bottom up. Stop as soon as you no longer see dry streaks. Overmixing develops gluten, leading to cakey brownies. If you’re adding chocolate chips, fold them in now.
Step 5: Bake to Perfection
Pour the batter into your prepared pan and smooth the top. Bake on the center rack for 30-35 minutes. Start checking at 30 minutes. The perfect doneness test: a toothpick inserted into the center should come out with a few moist crumbs clinging to it, not wet batter. The edges will look set and may just begin to pull away from the sides. Remember, they continue to set as they cool, so err on the side of slightly underbaked for maximum fudginess.
Step 6: Cool and Slice
This is the hardest part—patience. Let the brownies cool completely in the pan on a wire rack. Cutting into warm brownies is tempting but results in a messy, crumbly slice. Once fully cool (about 2 hours), use the parchment paper to lift the entire slab onto a cutting board. For clean, sharp squares, use a long, sharp knife and wipe it clean with a damp cloth between each cut.
Expert Tips & Tricks
- Room Temperature Eggs Are Key: Cold eggs don’t incorporate as well and can cause the melted chocolate to seize. To quickly bring eggs to room temp, place them in a bowl of warm water for 5-10 minutes.
- Don’t Overmix After Adding Flour: Fold just until combined. Overworking the flour develops gluten, which gives you cake-like brownies instead of fudgy ones.
- Test for Doneness Early: Ovens vary. Check a few minutes before the minimum time. The toothpick should have moist crumbs, not clean.
- Line Your Pan: Parchment paper with overhang is non-negotiable for easy, clean removal and slicing.
- For Extra Fudgy Brownies: Replace one of the eggs with an extra egg yolk. The added fat increases richness and fudgy texture.
- Storage: Store cooled brownies in an airtight container at room temperature for up to 4 days. For longer storage, freeze individual squares wrapped in plastic for up to 3 months.
Serving Suggestions
- Serve slightly warm with a scoop of vanilla ice cream for the classic à la mode experience.
- Drizzle with salted caramel sauce or raspberry coulis for an elegant twist.
- Crumble over yogurt or oatmeal for a decadent breakfast treat.
- Pair with a glass of cold milk, a rich stout beer, or a cup of strong coffee.
- Layer with whipped cream and berries for an easy brownie trifle.
Frequently Asked Questions
Can I make these brownies without a double boiler?
Absolutely. You can melt the butter and chocolate together in a microwave-safe bowl. Heat in 30-second bursts, stirring well between each, until smooth. Just be careful not to overheat and burn the chocolate.
What’s the difference between cakey and fudgy brownies?
It comes down to the fat-to-flour ratio and mixing method. Fudgy brownies (like these) have more fat (butter/chocolate) and less flour, and the batter is mixed minimally after adding flour. Cakey brownies have more flour and often use baking powder, and the eggs and sugar are beaten more to incorporate air.
Can I use cocoa powder instead of melted chocolate?
For this specific fudgy texture and shiny top, melted chocolate is essential. “Cocoa powder only” brownie recipes exist, but they yield a different, often cakier, result. Stick with the bar chocolate here.
My brownies didn’t get a shiny, crackly top. What happened?
The shiny top comes from properly dissolving the sugar in the eggs before adding the chocolate. Make sure you whisk the eggs and sugars vigorously for the full 1-2 minutes until thick and pale. Also, don’t overmix after adding the flour.
Can I add nuts or other mix-ins?
Of course! Fold in 1 cup of chopped walnuts, pecans, or even toasted almonds along with (or instead of) the chocolate chips. You could also add a swirl of peanut butter or a sprinkle of sea salt on top before baking.
How do I get perfectly clean slices?
Cool completely, lift out of the pan, and use a very sharp chef’s knife. Run the knife under hot water, wipe it dry, and make a single confident cut. Wipe the blade clean between each cut for pristine edges.
Go Ahead, Bake a Batch
There you have it—the blueprint for arguably the best fudgy brownies you’ll ever make. They store beautifully, freeze wonderfully, and have this magical ability to turn any day into a celebration. The beauty of this recipe is its simplicity with a huge payoff. So gather your ingredients, preheat that oven, and get ready to fill your kitchen with the incredible aroma of baking chocolate. I’d love to hear how yours turn out—did you add the extra chips? Did you nail that crinkly top? Happy baking!