The Ultimate Fluffy American Pancakes
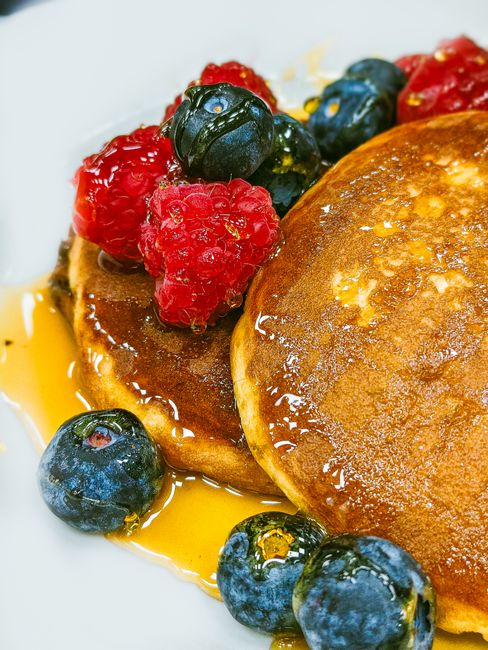
There’s something magical about a stack of perfect American pancakes. You know the kind I’m talking about – tall, golden-brown discs with those delicate bubbles on the surface, edges that are just crispy enough, and a center so light and fluffy it practically melts in your mouth. When you pour warm maple syrup over them and watch it cascade down the sides, pooling around fresh berries… that’s when you know you’ve got breakfast perfection.

What makes these American pancakes special isn’t just their texture (though that cloud-like fluffiness is pretty remarkable). It’s the ritual of making them. The sizzle when batter hits the hot griddle. The anticipation as those first bubbles form. The satisfying flip that reveals the perfect golden crust. And that moment when you bring that first forkful to your mouth, still steaming hot from the pan.
This recipe has been my weekend go-to for years, perfected through countless Saturday mornings and sleepy-eyed brunches. It’s straightforward enough for beginners but has enough little tricks to keep even experienced cooks coming back. Whether you’re cooking for a crowd or just treating yourself, these pancakes deliver that classic diner-style experience right in your own kitchen.
Recipe Overview
Nutrition Facts (per pancake)
- Calories: 285 kcal
- Protein: 8g
- Fat: 9g
- Carbohydrates: 42g
- Fiber: 1g
- Sugar: 12g (with syrup)
- Sodium: 480mg
Note: Nutrition values are for one pancake with 1 tablespoon maple syrup. Values may vary with different toppings.
Ingredients
Main Batter Ingredients
- 1 ½ cups all-purpose flour (190g) – spooned and leveled, not packed
- 3 ½ teaspoons baking powder – make sure it’s fresh for maximum lift
- 1 teaspoon salt – enhances all the flavors
- 1 tablespoon granulated sugar – helps with browning and flavor
- 1 ¼ cups milk (300ml) – whole milk works best, but any milk will do
- 1 large egg – at room temperature
- 3 tablespoons unsalted butter, melted – plus extra for cooking
- 1 teaspoon vanilla extract – pure vanilla for the best flavor
For Cooking & Serving
- Butter or neutral oil – for greasing the pan
- Pure maple syrup – warmed, for serving
- Fresh berries – strawberries, blueberries, or raspberries
- Whipped cream or yogurt – optional, for topping
Instructions
Step 1: Prepare Your Ingredients
Before you start mixing, measure everything out. This makes the process smoother and helps prevent overmixing. Take your egg out of the fridge about 15 minutes before you begin – room temperature ingredients combine better. Melt your butter and let it cool slightly so it doesn’t cook the egg when you mix it in. Measure your flour by spooning it into the measuring cup and leveling it off with a knife. Don’t scoop directly from the bag, as this packs the flour and can lead to dense pancakes.
Step 2: Mix Dry Ingredients Thoroughly
In a large mixing bowl, whisk together the flour, baking powder, salt, and sugar. You want to do this for about 30 seconds to ensure the baking powder is evenly distributed throughout the flour. Uneven distribution means some pancakes might rise beautifully while others stay flat. This is also when you can sift if you prefer – it aerates the flour and helps create an even lighter texture.
Step 3: Combine Wet Ingredients
In a separate bowl or large measuring jug, whisk together the milk, egg, melted butter, and vanilla extract. Whisk until the egg is fully incorporated and the mixture looks smooth and homogenous. The melted butter might want to separate or form little clumps when it hits the cold milk – that’s okay, just keep whisking until it’s as smooth as you can get it.
Step 4: Create the Batter (The Key Step!)
Now for the most important part: combining wet and dry. Make a well in the center of your dry ingredients and pour in the wet mixture. Using a spatula or wooden spoon, gently fold everything together. I mean gently – you’re not trying to beat the batter into submission. Stop folding when you no longer see dry flour. There will be lumps, and that’s exactly what you want. Overmixed batter develops gluten, which makes pancakes tough and rubbery. Lumpy batter makes fluffy pancakes.
Step 5: Let the Batter Rest
This might feel counterintuitive when you’re hungry, but it’s worth it. Cover the bowl with a kitchen towel and let the batter rest for 5-10 minutes while you heat your cooking surface. During this time, the baking powder starts to activate, creating tiny air bubbles that will expand during cooking. The flour also fully hydrates, resulting in more tender pancakes. You’ll notice the batter thicken slightly as it rests.
Step 6: Heat Your Cooking Surface
Heat a non-stick skillet, griddle, or heavy-bottomed frying pan over medium heat. If you have an electric griddle, set it to 350°F (175°C). To test if it’s ready, flick a few drops of water onto the surface. If they dance and evaporate quickly, you’re at the right temperature. If they sizzle violently and disappear instantly, it’s too hot. If they just sit there, it’s not hot enough. Lightly grease with butter or a neutral oil like vegetable or canola oil.
Step 7: Cook to Perfection
Using a ¼ cup measure or ladle, pour batter onto the hot surface. Leave about 2 inches between pancakes so you have room to flip. Cook for 2-3 minutes until you see bubbles forming all over the surface and the edges look set and slightly dry. The bottom should be golden brown. This is your visual cue to flip. Slide your spatula underneath and flip with confidence – one smooth motion. Cook for another 1-2 minutes on the second side until golden brown. Adjust your heat as needed – if they’re browning too fast, lower it slightly; if they’re taking forever, increase it a bit.
Step 8: Keep Them Warm and Serve
As you cook batches, transfer finished pancakes to a wire rack set over a baking sheet in a 200°F (95°C) oven. This keeps them warm without making them soggy (which happens if you stack them directly). Serve immediately with warm maple syrup, a pat of butter, and your favorite toppings. The first bite of a fresh, hot pancake is pure breakfast bliss.
Expert Tips & Tricks
- The Resting Secret: Don’t skip the 10-minute rest. It’s the difference between good pancakes and incredible, fluffy American pancakes.
- Temperature Control: Your first pancake is often a test pancake. Use it to adjust your heat. Perfect golden brown takes about 3 minutes per side at medium heat.
- Butter vs. Oil: Butter gives better flavor but burns at lower temperatures. For consistent browning, use a combination: butter for flavor on the first batch, then switch to oil or clarify your butter.
- Don’t Press! Never press down on your pancakes with the spatula while cooking. You’ll squeeze out all those precious air bubbles you worked so hard to create.
- Make-Ahead Batter: You can mix dry and wet ingredients separately the night before. Combine them in the morning for fresh pancakes without the morning measuring.
- Freezing: Cool pancakes completely, then freeze in a single layer on a baking sheet before transferring to freezer bags. Reheat in a toaster or oven at 350°F for 5-7 minutes.
- Buttermilk Variation: Replace milk with buttermilk and reduce baking powder to 2 teaspoons, adding ½ teaspoon baking soda. Buttermilk adds tang and tenderness.
- Perfect Circles: For perfectly round pancakes, use a squeeze bottle or piping bag to dispense the batter.
Serving Suggestions
- Classic Stack: Layer 2-3 pancakes with butter between each, top with warm maple syrup and fresh blueberries
- Berry Bonanza: Mix sliced strawberries, raspberries, and blackberries with a tablespoon of sugar, let macerate for 10 minutes, then spoon over pancakes
- Decadent Deluxe: Add chocolate chips to the batter, top with whipped cream and chocolate sauce
- Savory Twist: Reduce sugar to 1 teaspoon, add chopped herbs, and serve with smoked salmon and crème fraîche
- Protein Power: Serve with scrambled eggs, turkey bacon, and avocado on the side
- Fall Favorite: Add 1 teaspoon cinnamon and ½ teaspoon nutmeg to dry ingredients, top with sautéed apples and caramel sauce
Frequently Asked Questions
Why are my pancakes flat instead of fluffy?
Flat pancakes usually come from old baking powder, overmixing the batter, or not letting the batter rest. Baking powder loses potency over time – if yours has been open more than 6 months, replace it. Overmixing develops gluten, which prevents proper rising. And skipping the rest means the baking powder doesn’t have time to create those crucial air bubbles.
Can I make these pancakes vegan?
Absolutely! Replace the milk with almond or oat milk, use a flax egg (1 tablespoon ground flax + 3 tablespoons water, let sit 5 minutes), and substitute the butter with melted coconut oil or vegan butter. The texture will be slightly different but still delicious.
How do I know when to flip?
Watch for bubbles covering about 70% of the pancake’s surface, and look for the edges to appear set and slightly dry. The bottom should be golden brown (lift a corner gently to check). If you flip too early, the pancake might tear; too late, and it might burn.
Can I add mix-ins like blueberries or chocolate chips?
Yes, but add them after you pour the batter onto the griddle. Sprinkle them onto each pancake individually. If you mix them into the batter, they’ll sink to the bottom and potentially burn, and they can also cause uneven cooking.
How should I store leftover pancakes?
Cool completely, then store in an airtight container in the refrigerator for up to 3 days. Reheat in a toaster, toaster oven, or regular oven at 350°F for 5 minutes. Avoid microwaving if possible, as it makes them rubbery.
Why does the first pancake always turn out worse?
This is so common it’s practically a law of cooking! Your pan might not be at the perfect temperature yet, or you might need to adjust the amount of butter/oil. Many cooks call the first one the “chef’s treat” or use it to test seasoning. Don’t worry – the rest will be perfect.
Final Thoughts
There you have it – everything you need to make perfect American pancakes right at home. The beauty of this recipe is in its simplicity and reliability. Once you get the hang of it, you’ll find yourself making these fluffy delights not just for special weekend brunches, but for quick weekday breakfasts, late-night snacks, or even dessert.
Remember that cooking is as much about the experience as the result. Enjoy the process – the sound of batter hitting the hot griddle, the sweet smell that fills your kitchen, the satisfaction of that perfect flip. These pancakes have a way of turning an ordinary morning into something special.
Leftovers keep well in the fridge for a few days or freeze beautifully for up to 3 months. I often make a double batch and freeze half for busy mornings – they reheat perfectly in the toaster.
I’d love to hear how your pancakes turn out! What variations did you try? What’s your favorite topping combination? Whether you’re a pancake pro or trying this recipe for the first time, I hope it brings as much joy to your kitchen as it has to mine. Happy cooking!